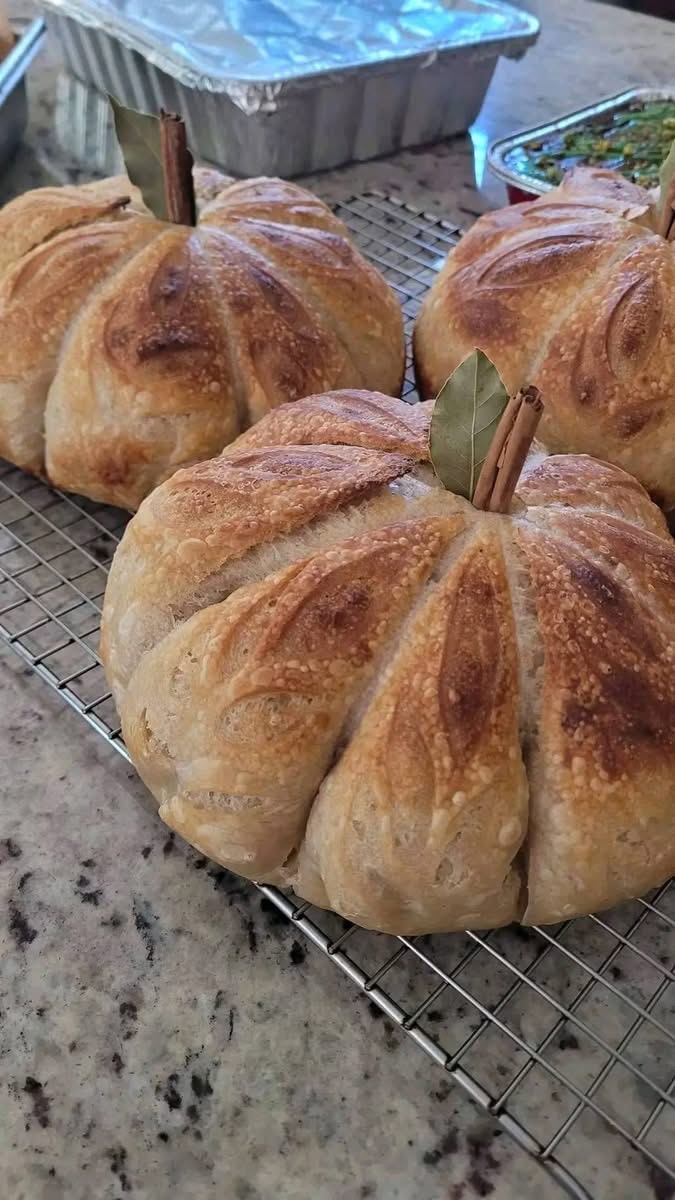
Rustic, Naturally Fermented Autumn Sourdough Bread 🥖🧡
🍁 Introduction
There is something magical about baking sourdough in autumn. 🍂 The smell of freshly baked bread fills the kitchen while the cooler weather makes us want to slow down, gather around the table, and enjoy something warm and homemade. 🏡☕️
These beautiful Sourdough Pumpkins are made with a simple sourdough dough, shaped into adorable pumpkin-like loaves and baked until golden brown. 🎃🥖 They have a crisp, caramelized crust, a soft and chewy interior, and that wonderful naturally fermented flavor that sourdough lovers adore. ❤️
This recipe makes 3 pumpkin-shaped sourdough loaves, perfect for sharing with family, gifting to friends, or serving as a beautiful centerpiece for an autumn table. 🍁🍞
🎃 Ingredients
🥖 For the Sourdough Dough
- 200 g active sourdough starter 🌾
- 750 g water 💧
- 1,000 g bread flour 🌾
- 24 g salt 🧂
🎃 For Shaping
- Food-safe kitchen twine 🧵
- A little flour for dusting 🌾
- Parchment paper, if needed 📜
- A small piece of cinnamon stick or a safe edible stem for decoration, optional 🌿
📏 Recipe Yield
This recipe makes approximately 3 large sourdough pumpkins. 🎃🎃🎃
The total dough weight is about 1,974 g, giving approximately:
- 🎃 Pumpkin 1: ~658 g
- 🎃 Pumpkin 2: ~658 g
- 🎃 Pumpkin 3: ~658 g
The dough has approximately 75% hydration, giving you a wonderfully open, rustic crumb. 🥖✨
📜 A Little History of Sourdough
Sourdough is one of the oldest ways humans have made leavened bread. 🌾🔥 Long before commercial yeast became common, bakers relied on naturally occurring wild yeast and beneficial bacteria living in flour and the surrounding environment.
A sourdough starter is a living culture made from flour and water. When regularly fed, the wild yeast produces carbon dioxide, which helps the bread rise, while lactic-acid-producing bacteria contribute to sourdough’s characteristic flavor. 🫧🥖
Over generations, sourdough became an important part of baking traditions around the world. From European farmhouse breads to San Francisco-style sourdough, naturally fermented bread has remained beloved by bread bakers. ❤️
And today, shaping sourdough into pumpkins adds a beautiful autumn twist to this ancient tradition. 🎃🍂
🧡 Why We Love Sourdough
There are many reasons sourdough has so many devoted fans. 🥖❤️
- 🌾 Deep flavor: Fermentation creates complex, slightly tangy flavors.
- 🥖 Wonderful texture: A well-fermented dough can produce a crisp crust and airy crumb.
- ⏳ Traditional fermentation: Sourdough uses time rather than relying solely on commercial yeast.
- 🏡 Homemade goodness: You control the ingredients that go into your bread.
- 🍂 Beautiful presentation: Pumpkin shaping turns ordinary bread into an autumn centerpiece.
- ❤️ A satisfying baking project: Feeding your starter, folding the dough, shaping the pumpkins, and watching them rise is part of the fun.
🌿 A note about benefits
Sourdough fermentation can change the structure and digestibility of the dough, and some people find naturally fermented bread easier to digest. However, sourdough is not suitable for people with celiac disease, because ordinary wheat sourdough still contains gluten.
🌾 Step 1 — Prepare Your Starter
Your starter should be active, bubbly, and recently fed. 🫧
A strong starter should rise noticeably after feeding and have plenty of bubbles throughout.
❤️ Starter Tip
If your starter is sluggish, give it another feeding and allow it to become active before beginning the recipe. A lively starter gives your pumpkins the best chance of rising beautifully. 🎃✨
💧 Step 2 — Mix the Dough
In a large mixing bowl, combine:
- 200 g active starter
- 750 g water
- 1,000 g bread flour
Mix thoroughly until there are no large pockets of dry flour. 🌾💧
The dough will be sticky and somewhat shaggy at first. Don’t worry! That’s normal for a high-hydration sourdough dough. 😊
Cover the bowl and let the dough rest for approximately 30–60 minutes.
This resting period allows the flour to absorb water and begins gluten development. 🥖
🧂 Step 3 — Add the Salt
After the initial rest, add:
24 g salt 🧂
Work the salt into the dough using wet hands. Pinch, fold, and squeeze the dough gently until the salt is evenly incorporated.
Cover again and allow the dough to continue fermenting. 🍞
🤲 Step 4 — Stretch and Fold
Now comes one of the most important parts of the process: stretch and folds! 💪🥖
You will do 4 sets of stretch and folds.
🔄 How to Stretch and Fold
- Wet your hands. 💧
- Grab one side of the dough.
- Gently stretch it upward without tearing.
- Fold it over the center.
- Turn the bowl.
- Repeat on all four sides.
- Cover the dough and let it rest.
Repeat the process for a total of 4 rounds.
You can space the folds roughly 30 minutes apart, depending on your dough and room temperature.
With each round, the dough should become smoother, stronger, and more elastic. ✨
🍂 Step 5 — Bulk Fermentation
After the stretch-and-fold process, allow the dough to continue fermenting at room temperature. ⏳
The exact time depends on:
- 🌡️ Room temperature
- 🌾 Starter strength
- 💧 Dough temperature
- 🥖 Flour
- ⏰ Fermentation activity
Rather than relying only on the clock, watch the dough.
👀 Look for:
- Increased volume
- Bubbles along the sides
- A smoother surface
- A lighter, airier feel
- Dough that has become slightly domed
Don’t necessarily wait for the dough to double. Depending on your fermentation conditions, a moderate rise can be enough.
🎃 Step 6 — Divide the Dough
Once bulk fermentation is complete, gently turn the dough onto a lightly floured work surface.
Divide it into 3 equal pieces. 🔪
Each piece should be approximately 658 g.
Try not to completely deflate the dough. We want to preserve those beautiful fermentation bubbles. 🫧❤️
🎃 Step 7 — Pre-Shape
Gently shape each piece into a loose round.
Let the three pieces rest for approximately 15–30 minutes, covered with a towel or bowl.
This resting period allows the gluten to relax, making final shaping easier. 🌾
🎃 Step 8 — Shape Your Pumpkin
Now for the fun part! 🍂🎃
Take one dough round and gently tighten it into a beautiful boule.
Place the shaped dough on parchment paper.
🧵 Creating the Pumpkin Shape
Use food-safe kitchen twine to create the pumpkin divisions.
- Cut several long pieces of kitchen twine.
- Arrange them so they cross underneath the dough.
- Gently bring the strands upward around the dough.
- Tie them loosely at the top.
- Create several sections around the loaf.
The twine should be loose enough to allow the dough to expand during proofing and baking.
Repeat with all three dough pieces. 🎃🎃🎃
⚠️ Important
Do not tie the twine tightly around the raw dough. The dough needs room to expand.
❄️ Step 9 — Final Proof
Place the shaped pumpkins into the refrigerator for a cold proof, preferably overnight. 🌙❄️
Cold fermentation can help develop flavor and makes the dough easier to score and handle.
A typical overnight proof might be around 8–16 hours, but fermentation time varies according to your starter and refrigerator.
🔥 Step 10 — Prepare the Oven
Preheat your oven thoroughly to approximately 230°C / 450°F.
If you’re using a baking vessel such as a Dutch oven, preheat it according to the manufacturer’s instructions. 🔥
A thoroughly preheated oven helps the dough achieve good oven spring. 🥖✨
🎃 Step 11 — Bake Your Pumpkin Loaves
Place each pumpkin loaf into an 8-inch cake pan or another suitable baking vessel that gives it enough room to expand.
Bake until the crust is beautifully golden brown. 🧡
For a crusty sourdough loaf, steam during the early part of baking can help develop a beautiful crust.
🔥 Baking Guide
A useful starting point is:
- 🔥 230°C / 450°F for the initial bake
- Then reduce the temperature if your oven browns the bread quickly.
- Continue baking until the loaves are deeply golden and thoroughly baked.
Because ovens vary, use the bread’s color and internal temperature as guides. A fully baked loaf is generally around 96–99°C / 205–210°F internally.
✂️ Step 12 — Remove the Twine
Allow the pumpkins to cool enough to handle safely.
Carefully cut and remove the kitchen twine. 🧵✂️
You should now see gorgeous pumpkin-like sections running around each loaf. 🎃✨
For a cute finishing touch, place a small piece of cinnamon stick on top as a decorative stem, if desired. 🌿
🍞 Step 13 — Cool Completely
This step requires patience! 😍
Place your sourdough pumpkins on a cooling rack and allow them to cool completely before slicing.
Cutting sourdough too early can make the crumb gummy because the interior is still setting.
Let the bread cool, then listen for that wonderful crackling crust. 🥖✨
🎃 Serving Ideas
Your pumpkin sourdough can be served in so many delicious ways! 🍂
- 🧈 Warm with salted butter
- 🍯 With honey
- 🧀 With cheese
- 🍎 Alongside apple butter
- 🍲 With pumpkin soup
- 🥣 With creamy autumn soups
- 🥪 Turn it into sandwiches
- 🥖 Serve it with olive oil and herbs
- ☕ Enjoy it with coffee or tea
For an autumn dinner, place the whole pumpkin loaf in the center of the table and let everyone tear off a piece. 🍂🏡❤️
💡 Sourdough Baker’s Tips
🌡️ Watch the Dough, Not Just the Clock
Fermentation changes with temperature. A warm kitchen can make the dough ferment much faster than a cool kitchen.
💧 Keep Your Hands Wet
This dough is fairly wet. Wet hands make stretching, folding, and shaping much easier. 💧
🌾 Don’t Add Too Much Flour
Adding lots of flour during shaping can make the final bread heavier. Use just enough to prevent excessive sticking.
🫧 Protect the Air Bubbles
Handle the fermented dough gently. Those bubbles are what help create a light, beautiful crumb.
🎃 Make the Twine Loose
The dough expands dramatically during proofing and baking, so the string should create the pumpkin shape without squeezing the loaf.
🔥 Preheat Properly
Give your oven and baking vessel plenty of time to heat before baking.
🍂 Autumn Flavor Variations
Want to make these pumpkins even more festive? 🎃✨
Try adding:
- 🌿 Rosemary and roasted garlic
- 🧄 Garlic and Parmesan
- 🌰 Toasted walnuts
- 🍇 Dried cranberries
- 🌻 Sunflower seeds
- 🎃 Pumpkin seeds
- 🍯 A touch of honey
- 🧀 Cheddar or another firm cheese
For additions, be mindful of their moisture content so they don’t make the dough excessively wet.
❤️ For Sourdough Lovers
There is something special about sourdough baking because the recipe isn’t only about ingredients. 🌾🥖
It’s about time, patience, touch, smell, and observation.
You begin with flour, water, salt, and starter. Then you mix, fold, wait, shape, wait again, and finally bake.
And somehow, those simple ingredients become a beautiful loaf that looks like a pumpkin. 🎃
That’s the magic of sourdough. ✨
Whether you’re an experienced baker or making your first decorative loaf, don’t worry about making every pumpkin perfectly symmetrical. The little imperfections are part of the charm. 🍂❤️
🎃 Troubleshooting
My dough is too sticky!
High-hydration dough naturally feels sticky. Try wetting your hands instead of adding lots of flour.
My dough isn’t rising.
Check that your starter is active and that the dough is warm enough to ferment. A cold kitchen can significantly slow fermentation.
My pumpkin lost its shape.
The twine may have been too loose, or the dough may have been over-fermented. Make sure the pumpkin is shaped with good surface tension and handle it gently.
My crust is getting too dark.
Reduce the oven temperature or cover the loaf during part of the bake.
My crumb is gummy.
The loaf may have been underbaked or sliced before it cooled completely. Bake thoroughly and allow it to cool before cutting.
🍁 Conclusion
These Sourdough Pumpkins are more than just bread—they’re an autumn baking experience. 🎃🍂🥖
With only four main ingredients—active sourdough starter, water, bread flour, and salt—you can create three gorgeous rustic loaves filled with natural fermentation flavor.
The four rounds of stretch and folds build strength, the long fermentation develops flavor, and the pumpkin shaping transforms the dough into something wonderfully festive. 🧡
So turn on the oven, feed your starter, gather your flour, and enjoy the slow rhythm of sourdough baking. 🌾🔥
🎃 Happy baking, sourdough lovers! 🍂❤️
May your crust be crispy, your crumb be airy, your starter be bubbly, and your kitchen smell absolutely amazing! 🥖🧈☕️🎃
🍂 Bake it. Share it. Love it. Repeat. 🍂