Introduction
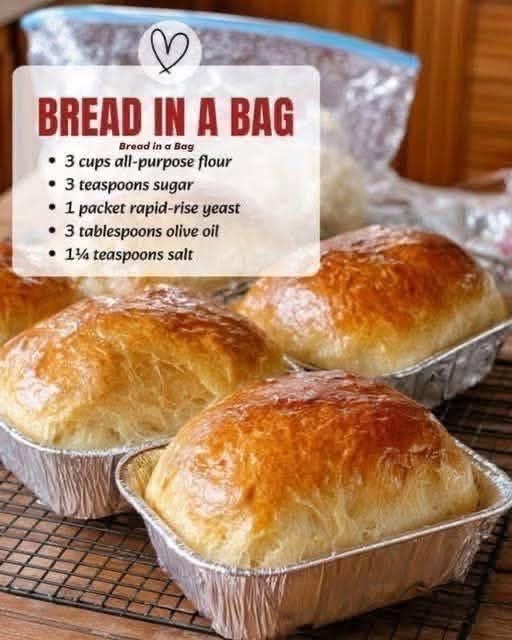
This Bread in a Bag recipe is a brilliant, mess-free way to make homemade bread from scratch. If you’ve ever wanted to bake bread but were intimidated by flour-covered counters and sticky dough, this is the recipe for you. Using a simple zip-top plastic bag, you can mix, knead, and proof the dough all in one container—no stand mixer, no giant bowls, and absolutely no mess. The result is a beautifully golden, soft, and fluffy white bread that tastes like it came from a bakery. It’s a fantastic kitchen science project for kids and a lifesaver for busy adults who want fresh bread with minimal cleanup.
Ingredients
· 3 cups all-purpose flour (divided)
· 3 teaspoons granulated sugar
· 1 packet (2¼ tsp) rapid-rise yeast
· 1 cup warm water (110°F – 115°F / 43°C – 46°C)
· 3 tablespoons olive oil (or vegetable oil)
· 1¼ teaspoons salt
· Optional: 1 egg, beaten (for egg wash)
· Optional: Melted butter, for brushing the tops
Instructions
Step 1: Prepare the Bag
Use a large, heavy-duty gallon-sized zip-top plastic bag.
Step 2: Activate the Yeast
Add the warm water, sugar, and yeast to the bag. Seal the bag tightly and gently squish it with your hands to mix. Let it sit for 5–10 minutes until the mixture becomes foamy and bubbly.
Step 3: Add the First Ingredients
Add 1 cup of the flour and the olive oil to the bag. Seal the bag and squish and knead it until everything is completely combined and smooth.
Step 4: Add the Rest of the Flour
Add the remaining 2 cups of flour and the salt. Seal the bag again, pressing out the excess air. Knead the bag by squishing and turning it over for about 5–8 minutes, until the dough forms a cohesive ball and pulls away from the sides of the bag. (If it’s too sticky, add a tablespoon of flour; if too dry, add a teaspoon of water).
Step 5: First Rise
Leave the dough in the sealed bag. Place the bag in a warm spot and let it rise for 45–60 minutes, or until it has doubled in size.
Step 6: Shape the Loaves
Lightly grease a standard loaf pan (or two small foil loaf pans, as pictured). Carefully cut a corner off the bottom of the plastic bag and squeeze the dough out onto a lightly floured surface. Knead it just a couple of times by hand to release the air, shape it into a loaf, and place it in the pan.
Step 7: Second Rise
Cover the loaf pan loosely with a clean kitchen towel and let it rise for another 30 minutes.
Step 8: Bake
Preheat the oven to 375°F (190°C). If desired, brush the top of the loaf with beaten egg for a shiny, golden crust. Bake for 30–35 minutes, until the bread is golden brown and sounds hollow when tapped on the bottom.
Step 9: Cool and Serve
Remove the bread from the pan immediately and let it cool on a wire rack. Brush with melted butter (optional) and slice when slightly warm.
Methods
Method 1: Classic Oven Bake (as written above)
Best for a beautiful, golden, bakery-style loaf.
Method 2: Small Foil Pans
For individual gift-sized loaves, divide the dough into 3 or 4 small disposable foil pans. Reduce the baking time to 20–25 minutes.
Method 3: Bread Rolls
Divide the dough into 8–10 equal pieces, roll into balls, and place on a greased baking sheet. Bake at 375°F (190°C) for 15–18 minutes.
Method 4: Air Fryer
Place the shaped loaf in an air fryer-safe pan and bake at 320°F (160°C) for 20–25 minutes, until golden.
Method 5: Gluten-Free
Use a 1:1 gluten-free bread flour blend. Note: Gluten-free dough requires less kneading and often needs a binder like xanthan gum (check your blend).
History
The concept of “Bread in a Bag” emerged as a popular children’s activity and a beginner’s baking hack. It became widely popularized in the 2010s on social media and educational platforms like 4-H and home economics classes. The plastic bag acts as a makeshift mixing bowl and kneading surface, trapping the yeast’s gases and making the dough easy to handle without getting your hands dirty. While the method is modern, the ingredients are ancient. Bread has been a staple of human diets for over 10,000 years, and the simple combination of flour, water, yeast, and salt remains one of the most beloved culinary traditions in the world. This recipe takes that ancient tradition and makes it accessible, fun, and mess-free for everyone.
Benefits
· Minimal Mess: No floury counters, no sticky hands, and no big bowls to wash.
· Kid-Friendly: An excellent activity for kids to learn about baking and science.
· Budget-Friendly: Uses basic, inexpensive pantry staples.
· No Mixer Required: No heavy appliances needed.
· Quick and Easy: Ready in about 2 hours, including rise time.
· Versatile: Can be baked as a loaf, rolls, or small gift loaves.
· Freezer-Friendly: Freezes beautifully for up to 3 months.
· Impressive: Nothing beats the smell and taste of fresh homemade bread.
Variations
· Whole Wheat Bread: Substitute 1 cup of all-purpose flour with whole wheat flour.
· Garlic Herb Bread: Add 1 tsp garlic powder and 1 tbsp dried rosemary or oregano.
· Cinnamon Raisin: Add 1 tbsp cinnamon and ½ cup raisins to the dough.
· Cheesy Bread: Fold in ½ cup shredded cheddar cheese before shaping.
· Honey Bread: Substitute the sugar with 2 tablespoons of honey.
· Seeded Bread: Sprinkle sesame, poppy, or sunflower seeds on top before baking.
Conclusion
This Bread in a Bag recipe proves that making homemade bread doesn’t have to be a daunting, messy chore. With a simple plastic bag and a few pantry staples, you can create a soft, delicious loaf of bread that your whole family will love. It’s a wonderful activity to do with kids, a great way to save money on groceries, and a satisfying skill to master. Once you try this method, you’ll never look at store-bought bread the same way again.
For the Lovers
For those who truly adore this bread, here are the best ways to enjoy it:
· The Classic: Slice warm and spread with butter and honey.
· The Sandwich Star: Use thick slices for grilled cheese, BLTs, or peanut butter and jelly.
· The Breakfast Treat: Make French toast or toast it and top with avocado and an egg.
· The Gift: Bake in mini foil pans, wrap in cellophane, and tie with a ribbon.
· The Leftover Lover: Store in an airtight bag at room temperature for up to 3 days, or freeze for up to 3 months.
· The Soup Companion: Serve with a warm bowl of soup or chili for dipping.
· The Crouton Maker: Cube stale bread, toss with olive oil and herbs, and bake for homemade croutons.
Final Methods Recap
· Method 1: Classic Oven Bake—mix in a bag, let rise 45–60 minutes, shape, rise 30 minutes, bake at 375°F (190°C) for 30–35 minutes.
· Method 2: Small Foil Pans—divide dough, bake for 20–25 minutes.
· Method 3: Bread Rolls—roll into balls, bake for 15–18 minutes.
· Method 4: Air Fryer—bake at 320°F (160°C) for 20–25 minutes.
· Method 5: Gluten-Free—use a 1:1 gluten-free flour blend.