Introduction
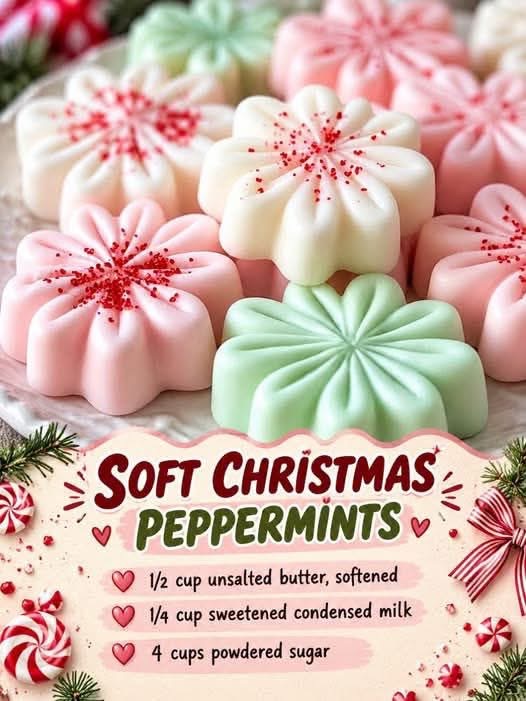
These Soft Christmas Peppermints are a nostalgic holiday treat that melts in your mouth! Unlike hard, store-bought peppermints, these are creamy, buttery, and incredibly tender, similar to the texture of a soft butter mint. With just four simple ingredients—butter, sweetened condensed milk, powdered sugar, and peppermint extract—you can create beautiful, pastel-colored mints that look absolutely stunning on a holiday cookie platter. They are perfect for gifting, adding to treat boxes, or simply enjoying with a warm cup of cocoa. The best part? They require absolutely no baking, making them a stress-free addition to your holiday preparations.
Ingredients
· ½ cup unsalted butter, softened (room temperature)
· ¼ cup sweetened condensed milk
· 4 cups powdered sugar (plus extra for dusting)
· 1 tsp peppermint extract (or to taste)
· Optional: Gel food coloring (red, green, or pink)
· Optional: Crushed peppermint candies or red/green sanding sugar for decoration
Instructions
Step 1: Cream the Butter and Milk
In a large bowl using an electric mixer, beat the softened butter and sweetened condensed milk together until smooth and creamy.
Step 2: Add the Flavoring
Mix in the peppermint extract until well combined.
Step 3: Add the Powdered Sugar
Gradually add the powdered sugar, 1 cup at a time, mixing on low speed. As the mixture thickens, you may need to switch to kneading it with your hands. The dough should be smooth, pliable, and similar to the texture of playdough. If it’s too sticky, add a little more powdered sugar; if it’s too crumbly, add a tiny drop of condensed milk.
Step 4: Color the Dough (Optional)
Divide the dough into separate bowls and add a few drops of gel food coloring to each. Knead the color in until evenly distributed.
Step 5: Shape the Mints
Lightly dust your counter or a cutting board with powdered sugar. Roll the dough into small ½-inch to 1-inch balls.
Step 6: Press into Molds (or flatten)
If using silicone candy molds (like the snowflake shapes in the photo), press the dough firmly into the mold and level off the top. If you don’t have molds, simply press the balls flat with the tines of a fork or the bottom of a glass.
Step 7: Unmold and Decorate
Carefully pop the mints out of the molds. Decorate with a sprinkle of sanding sugar or crushed peppermint candies.
Step 8: Set
Let the mints sit uncovered at room temperature for 1–2 hours to firm up slightly. They should remain soft and creamy.
Methods
Method 1: Silicone Molds (as written above)
Best for creating beautiful, uniform shapes that look professional and festive.
Method 2: Drop and Press
Roll the dough into 1-inch balls and place them on a parchment-lined baking sheet. Press down gently with a fork to create a rustic, crisscross pattern.
Method 3: Log and Slice
Roll the dough into a log (about 1 inch in diameter), wrap it in plastic wrap, and chill for 30 minutes. Slice into ¼-inch thick discs for a classic mint look.
Method 4: Two-Tone Mints
Take a small piece of red dough and a small piece of white dough, press them together, and roll into a ball before pressing into a mold for a swirled effect.
Method 5: Gluten-Free
This recipe is naturally gluten-free. Just ensure all your optional decorations are gluten-free.
History
Butter mints have been a staple of American weddings and holiday celebrations since the mid-20th century. Originally, they were served at weddings in the Midwest and quickly spread across the country as a symbol of hospitality. The traditional wedding mint was often a pastel, melt-in-your-mouth confection made with butter, cream, and sugar. During the holiday season, home bakers adapted this recipe by adding peppermint extract and festive colors. The invention of sweetened condensed milk in the 1850s by Gail Borden made these types of no-bake confections incredibly accessible to home cooks. Today, soft peppermints remain a beloved nostalgic treat, reminding many of childhood holidays and homemade gifts.
Benefits
· No-Bake: Perfect for busy holiday schedules when the oven is already full.
· Quick and Easy: Only 4 main ingredients and ready in minutes.
· Kid-Friendly: Fun and safe for kids to help mix, color, and shape.
· Beautiful Presentation: Look impressive on cookie trays and in gift boxes.
· Make-Ahead Friendly: Can be made weeks in advance.
· Budget-Friendly: Uses basic pantry staples.
· Customizable: Change the colors and shapes for any holiday.
· Melt-in-Your-Mouth: The texture is incredibly soft and creamy.
Variations
· Chocolate Peppermint: Add 2 tbsp cocoa powder to the powdered sugar.
· Lemon Mints: Substitute the peppermint extract with lemon extract and use yellow food coloring.
· Cinnamon Mints: Substitute the peppermint extract with cinnamon oil.
· Nutty Mints: Add finely crushed nuts to the dough.
· Coconut Mints: Substitute ½ cup of the powdered sugar with finely shredded coconut.
· Vegan: Use vegan butter and a dairy-free sweetened condensed milk alternative.
Conclusion
These Soft Christmas Peppermints are the perfect addition to your holiday baking lineup. They are creamy, minty, and utterly irresistible, providing a softer, more decadent alternative to traditional hard candy. With just four ingredients and no oven required, they are a foolproof way to add a touch of homemade magic to your holiday season. Whether you shape them into festive snowflakes or simple little drops, they are guaranteed to bring a smile to anyone’s face.
For the Lovers
For those who truly adore these mints, here are the best ways to enjoy them:
· The Holiday Platter: Arrange them on a tray with Christmas cookies and fudge.
· The Gift: Package them in a pretty tin with parchment paper between layers.
· The Hot Cocoa Pairing: Drop one or two into a mug of hot chocolate and watch it melt.
· The Leftover Lover: Store in an airtight container at room temperature for up to 2 weeks, or freeze for up to 3 months.
· The After-Dinner Treat: Serve them with coffee or tea after a heavy holiday meal.
· The Party Favor: Put them in small cellophane bags with a ribbon for guests to take home.
· The Midnight Snack: Keep a secret stash in the fridge for a quick minty fix.
Final Methods Recap
· Method 1: Silicone Molds—press dough into festive molds, unmold, and let set.
· Method 2: Drop and Press—roll into balls, press with a fork, and let set.
· Method 3: Log and Slice—roll into a log, chill, slice into discs.
· Method 4: Two-Tone—combine two colors for a swirled look.
· Method 5: Gluten-Free—naturally gluten-free, just check decorations.